272 lines
7.7 KiB
Markdown
272 lines
7.7 KiB
Markdown
# waifu2x
|
|
|
|
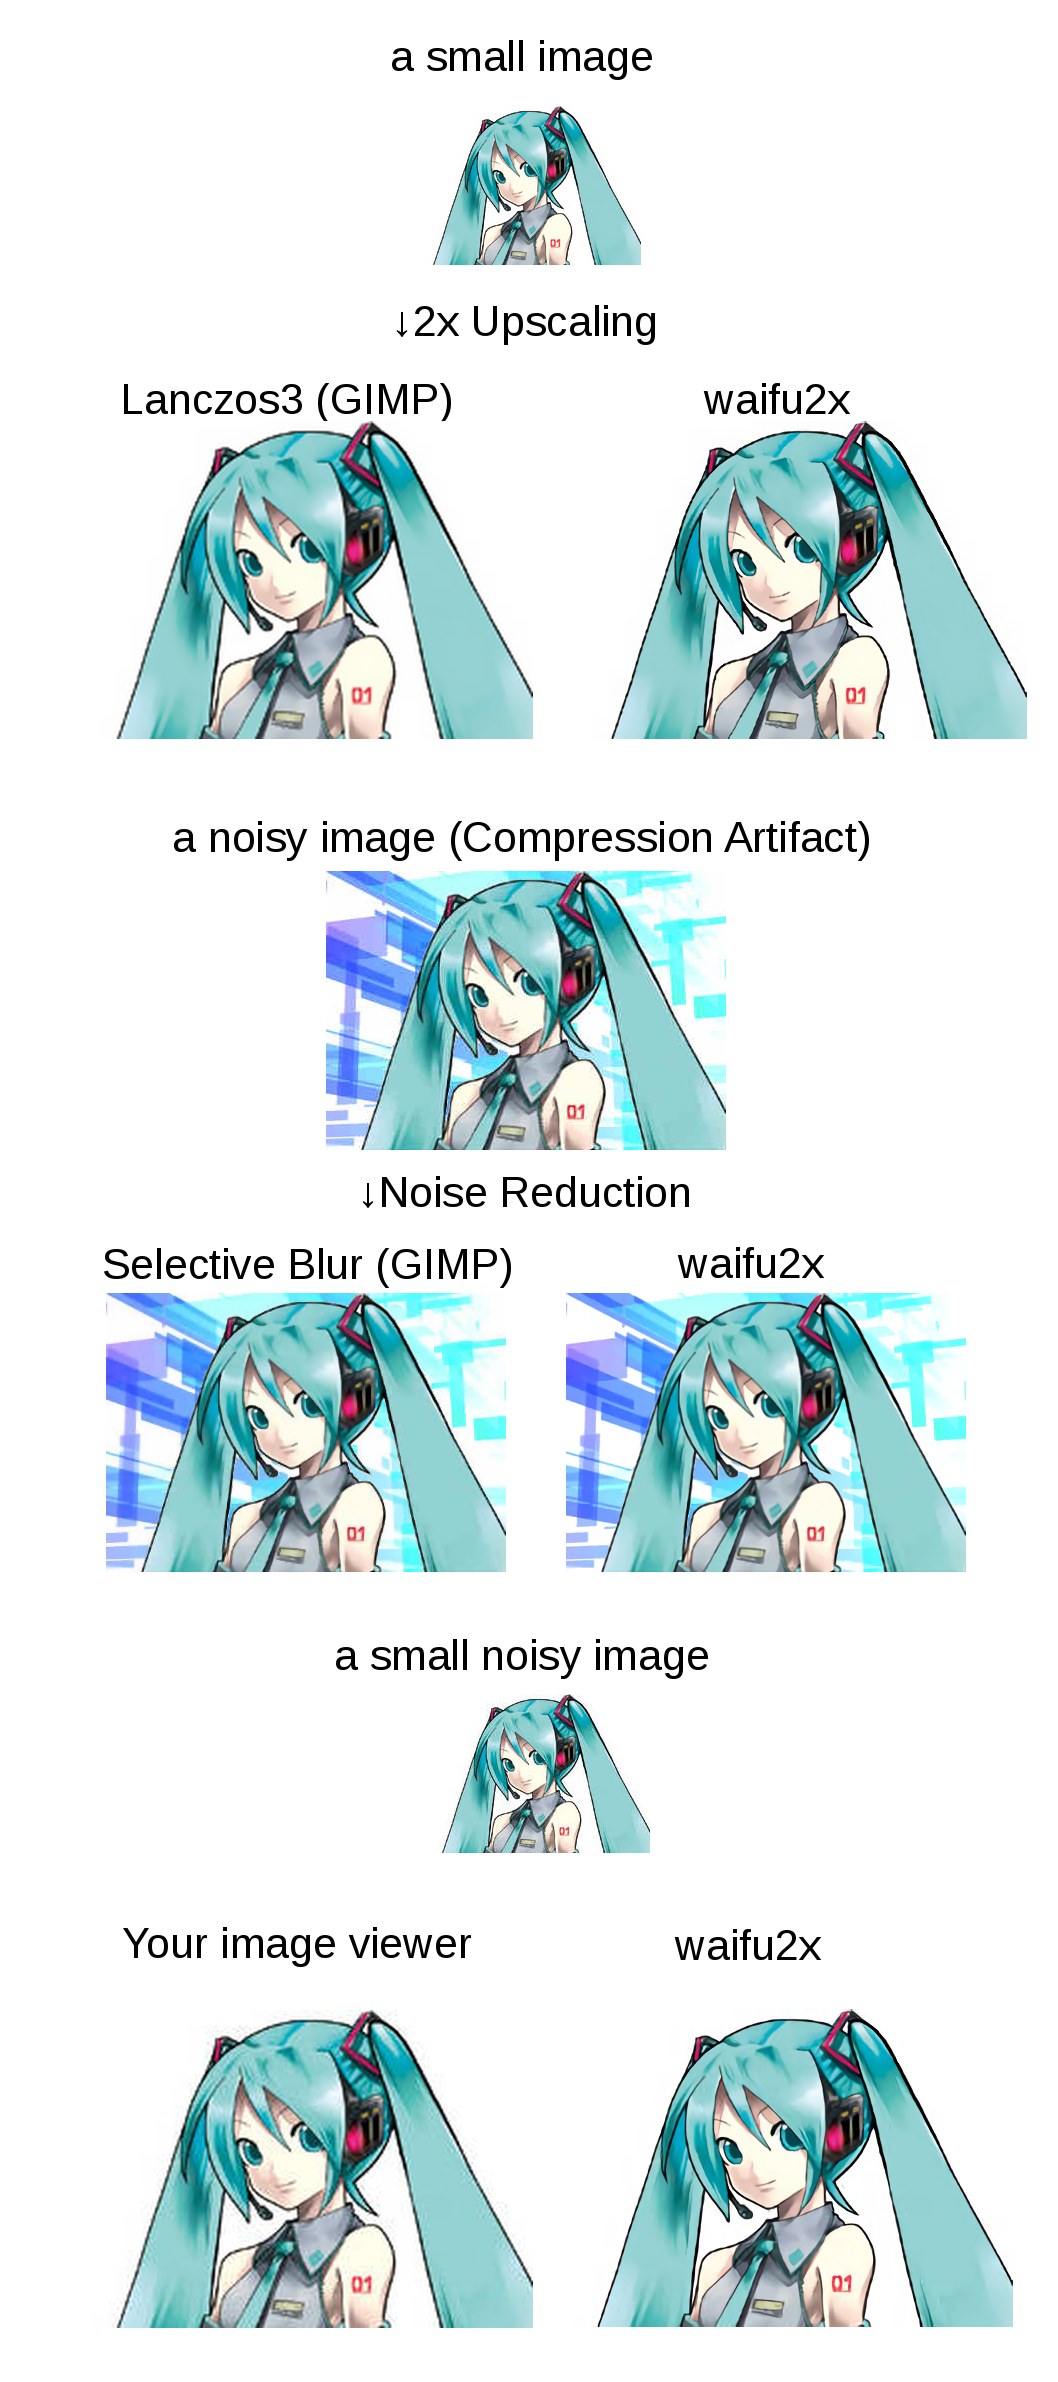
Image Super-Resolution for Anime-style art using Deep Convolutional Neural Networks.
|
|
And it supports photo.
|
|
|
|
The demo application can be found at http://waifu2x.udp.jp/ .
|
|
|
|
## Summary
|
|
|
|
Click to see the slide show.
|
|
|
|
|
|
|
|
## References
|
|
|
|
waifu2x is inspired by SRCNN [1]. 2D character picture (HatsuneMiku) is licensed under CC BY-NC by piapro [2].
|
|
|
|
- [1] Chao Dong, Chen Change Loy, Kaiming He, Xiaoou Tang, "Image Super-Resolution Using Deep Convolutional Networks", http://arxiv.org/abs/1501.00092
|
|
- [2] "For Creators", http://piapro.net/en_for_creators.html
|
|
|
|
## Public AMI
|
|
```
|
|
Region: us-east-1 (N.Virginia)
|
|
AMI ID: ami-b9be23ae
|
|
AMI NAME: waifu2x-server 20160807
|
|
Instance Type: g2.2xlarge
|
|
OS: Ubuntu 14.04
|
|
User: ubuntu
|
|
Created at: 2016-08-07
|
|
```
|
|
See ~/README.md
|
|
|
|
Please update the git repo first.
|
|
```
|
|
git pull
|
|
```
|
|
|
|
## Third Party Software
|
|
|
|
[Third-Party](https://github.com/nagadomi/waifu2x/wiki/Third-Party)
|
|
|
|
If you are a windows user, I recommend you to use [waifu2x-caffe](https://github.com/lltcggie/waifu2x-caffe)(Just download from `releases` tab) or [waifu2x-conver-cpp](https://github.com/DeadSix27/waifu2x-converter-cpp).
|
|
|
|
## Dependencies
|
|
|
|
### Hardware
|
|
- NVIDIA GPU
|
|
|
|
### Platform
|
|
|
|
- [Torch7](http://torch.ch/)
|
|
- [NVIDIA CUDA](https://developer.nvidia.com/cuda-toolkit)
|
|
|
|
### LuaRocks packages (excludes torch7's default packages)
|
|
- lua-csnappy
|
|
- md5
|
|
- uuid
|
|
- csvigo
|
|
- [turbo](https://github.com/kernelsauce/turbo)
|
|
|
|
## Installation
|
|
|
|
### Setting Up the Command Line Tool Environment
|
|
(on Ubuntu 14.04)
|
|
|
|
#### Install CUDA
|
|
|
|
See: [NVIDIA CUDA Getting Started Guide for Linux](http://docs.nvidia.com/cuda/cuda-getting-started-guide-for-linux/#ubuntu-installation)
|
|
|
|
Download [CUDA](http://developer.nvidia.com/cuda-downloads)
|
|
|
|
```
|
|
sudo dpkg -i cuda-repo-ubuntu1404_7.5-18_amd64.deb
|
|
sudo apt-get update
|
|
sudo apt-get install cuda
|
|
```
|
|
|
|
#### Install Package
|
|
|
|
```
|
|
sudo apt-get install libsnappy-dev
|
|
sudo apt-get install libgraphicsmagick1-dev
|
|
```
|
|
|
|
#### Install Torch7
|
|
|
|
See: [Getting started with Torch](http://torch.ch/docs/getting-started.html)
|
|
|
|
And install luarocks packages.
|
|
```
|
|
luarocks install graphicsmagick # upgrade
|
|
luarocks install threads # upgrade
|
|
luarocks install lua-csnappy
|
|
luarocks install md5
|
|
luarocks install uuid
|
|
luarocks install csvigo
|
|
|
|
# if you need to use web application
|
|
PREFIX=$HOME/torch/install luarocks install turbo
|
|
|
|
# if you need to use cuDNN library. cuDNN is required.
|
|
luarocks install cudnn
|
|
```
|
|
|
|
#### Getting waifu2x
|
|
|
|
```
|
|
git clone --depth 1 https://github.com/nagadomi/waifu2x.git
|
|
```
|
|
|
|
#### Validation
|
|
|
|
Testing the waifu2x command line tool.
|
|
```
|
|
th waifu2x.lua
|
|
```
|
|
|
|
## Web Application
|
|
```
|
|
th web.lua
|
|
```
|
|
|
|
View at: http://localhost:8812/
|
|
|
|
## Command line tools
|
|
Notes: If you have cuDNN library, than you can use cuDNN with `-force_cudnn 1` option. cuDNN is too much faster than default kernel.
|
|
|
|
### Noise Reduction
|
|
```
|
|
th waifu2x.lua -m noise -noise_level 1 -i input_image.png -o output_image.png
|
|
```
|
|
```
|
|
th waifu2x.lua -m noise -noise_level 0 -i input_image.png -o output_image.png
|
|
th waifu2x.lua -m noise -noise_level 2 -i input_image.png -o output_image.png
|
|
th waifu2x.lua -m noise -noise_level 3 -i input_image.png -o output_image.png
|
|
```
|
|
|
|
### 2x Upscaling
|
|
```
|
|
th waifu2x.lua -m scale -i input_image.png -o output_image.png
|
|
```
|
|
|
|
### Noise Reduction + 2x Upscaling
|
|
```
|
|
th waifu2x.lua -m noise_scale -noise_level 1 -i input_image.png -o output_image.png
|
|
```
|
|
```
|
|
th waifu2x.lua -m noise_scale -noise_level 0 -i input_image.png -o output_image.png
|
|
th waifu2x.lua -m noise_scale -noise_level 2 -i input_image.png -o output_image.png
|
|
th waifu2x.lua -m noise_scale -noise_level 3 -i input_image.png -o output_image.png
|
|
```
|
|
|
|
### Batch conversion
|
|
|
|
```
|
|
find /path/to/imagedir -name "*.png" -o -name "*.jpg" > image_list.txt
|
|
th waifu2x.lua -m scale -l ./image_list.txt -o /path/to/outputdir/prefix_%d.png
|
|
```
|
|
|
|
The output format supports `%s` and `%d`(e.g. %06d). `%s` will be replaced the basename of the source filename. `%d` will be replaced a sequence number.
|
|
For example, when input filename is `piyo.png`, `%s_%03d.png` will be replaced `piyo_001.png`.
|
|
|
|
See also `th waifu2x.lua -h`.
|
|
|
|
### Using photo model
|
|
|
|
Please add `-model_dir models/photo` to command line option, if you want to use photo model.
|
|
For example,
|
|
|
|
```
|
|
th waifu2x.lua -model_dir models/photo -m scale -i input_image.png -o output_image.png
|
|
```
|
|
|
|
### Video Encoding
|
|
|
|
\* `avconv` is alias of `ffmpeg` on Ubuntu 14.04.
|
|
|
|
Extracting images and audio from a video. (range: 00:09:00 ~ 00:12:00)
|
|
```
|
|
mkdir frames
|
|
avconv -i data/raw.avi -ss 00:09:00 -t 00:03:00 -r 24 -f image2 frames/%06d.png
|
|
avconv -i data/raw.avi -ss 00:09:00 -t 00:03:00 audio.mp3
|
|
```
|
|
|
|
Generating a image list.
|
|
```
|
|
find ./frames -name "*.png" |sort > data/frame.txt
|
|
```
|
|
|
|
waifu2x (for example, noise reduction)
|
|
```
|
|
mkdir new_frames
|
|
th waifu2x.lua -m noise -noise_level 1 -resume 1 -l data/frame.txt -o new_frames/%d.png
|
|
```
|
|
|
|
Generating a video from waifu2xed images and audio.
|
|
```
|
|
avconv -f image2 -framerate 24 -i new_frames/%d.png -i audio.mp3 -r 24 -vcodec libx264 -crf 16 video.mp4
|
|
```
|
|
|
|
## Train Your Own Model
|
|
Note1: If you have cuDNN library, you can use cudnn kernel with `-backend cudnn` option. And, you can convert trained cudnn model to cunn model with `tools/rebuild.lua`.
|
|
|
|
Note2: The command that was used to train for waifu2x's pretraind models is available at `appendix/train_upconv_7_art.sh`, `appendix/train_upconv_7_photo.sh`. Maybe it is helpful.
|
|
|
|
### Data Preparation
|
|
|
|
Genrating a file list.
|
|
```
|
|
find /path/to/image/dir -name "*.png" > data/image_list.txt
|
|
```
|
|
You should use noise free images. In my case, waifu2x is trained with 6000 high-resolution-noise-free-PNG images.
|
|
|
|
Converting training data.
|
|
```
|
|
th convert_data.lua
|
|
```
|
|
|
|
### Train a Noise Reduction(level1) model
|
|
|
|
```
|
|
mkdir models/my_model
|
|
th train.lua -model_dir models/my_model -method noise -noise_level 1 -test images/miku_noisy.png
|
|
# usage
|
|
th waifu2x.lua -model_dir models/my_model -m noise -noise_level 1 -i images/miku_noisy.png -o output.png
|
|
```
|
|
You can check the performance of model with `models/my_model/noise1_best.png`.
|
|
|
|
### Train a Noise Reduction(level2) model
|
|
|
|
```
|
|
th train.lua -model_dir models/my_model -method noise -noise_level 2 -test images/miku_noisy.png
|
|
# usage
|
|
th waifu2x.lua -model_dir models/my_model -m noise -noise_level 2 -i images/miku_noisy.png -o output.png
|
|
```
|
|
You can check the performance of model with `models/my_model/noise2_best.png`.
|
|
|
|
### Train a 2x UpScaling model
|
|
|
|
```
|
|
th train.lua -model upconv_7 -model_dir models/my_model -method scale -scale 2 -test images/miku_small.png
|
|
# usage
|
|
th waifu2x.lua -model_dir models/my_model -m scale -scale 2 -i images/miku_small.png -o output.png
|
|
```
|
|
You can check the performance of model with `models/my_model/scale2.0x_best.png`.
|
|
|
|
### Train a 2x and noise reduction fusion model
|
|
|
|
```
|
|
th train.lua -model upconv_7 -model_dir models/my_model -method noise_scale -scale 2 -noise_level 1 -test images/miku_small.png
|
|
# usage
|
|
th waifu2x.lua -model_dir models/my_model -m noise_scale -scale 2 -noise_level 1 -i images/miku_small.png -o output.png
|
|
```
|
|
You can check the performance of model with `models/my_model/noise1_scale2.0x_best.png`.
|
|
|
|
## Docker
|
|
|
|
Requires `nvidia-docker`.
|
|
|
|
```
|
|
docker build -t waifu2x .
|
|
nvidia-docker run -p 8812:8812 waifu2x th web.lua
|
|
nvidia-docker run -v `pwd`/images:/images waifu2x th waifu2x.lua -force_cudnn 1 -m scale -scale 2 -i /images/miku_small.png -o /images/output.png
|
|
```
|
|
|
|
Note that running waifu2x in without [JIT caching](https://devblogs.nvidia.com/parallelforall/cuda-pro-tip-understand-fat-binaries-jit-caching/) is very slow, which is what would happen if you use docker.
|
|
For a workaround, you can mount a host volume to the `CUDA_CACHE_PATH`, for instance,
|
|
|
|
```
|
|
nvidia-docker run -v $PWD/ComputeCache:/root/.nv/ComputeCache waifu2x th waifu2x.lua --help
|
|
```
|